Organza topiary “Sea breeze. Organza topiary - master class
Today it is very important to use hand made work to decorate the interior. And if such work was done with her own hands, then she has every right to become the pride of the housewife. If you have never tried your hand at creating a topiary, then I advise you to read the author’s recommendations and try to make such an unusual tree of happiness, which, thanks to its theme, will be relevant all year round. You can decorate your home or workplace with such an unusual thing, or even give it as a gift to one of your friends.
First, let's prepare everything that will be needed in the process of making a tree of happiness:
1. Floral organza in blue or light blue.
2. Base ball. This could be a foam ball or a ping pong ball.
3. Toothpicks.
4. A small metal bucket (flower pot) or coffee cup.
5. Blue sisal.
6. Hot glue gun.
7. Small stapler.
8. Scissors.
9. Beads.
10. Panicles of dried flowers. In this case, the author uses lagurus.
11. Alabaster.
12. Water.
13 Container for mixing the solution.
14. Pre-painted twig for topiary trunk. The author uses a corilus branch painted with silver paint from an aerosol can.
15. Marine decor: shells of different sizes, dried sea stars.
1 step.
Since we plan to decorate the topiary with organza, we will begin the work process. First, cut the organza into strips about 5 cm wide and cut these strips into squares. You will need a great many squares.
Step 2.
Then we put together the pieces from the squares to decorate the ball. To do this, take two organza squares and place them on top of each other as shown in photo 3. Fold the resulting structure in half (photo 4). Then cut it in half again to make a triangle like this and chop off this part in the corner with a stapler (photo 5). As a result, you have a detail that will help you decorate the base ball. This part is called a “pound”. According to the instructions described above, make quite a lot of pounds.
Step 3.
In this case, the author uses a foam ball as a base. If you use a ping pong ball, then you just need to glue the pounds to the surface of the ball, but in the case of a foam ball, it will be better if you first glue toothpicks to the pounds using hot glue and then just stick the toothpicks with pounds into the surface of the foam ball.
Step 4
Now let’s take the base ball, make a hole in it equal in diameter to the barrel and secure the barrel with hot glue.
Step 5
After the glue has cooled and firmly secured the barrel in the base ball, apply a drop of glue to the surface of the foam ball and carefully insert a toothpick with a previously glued pound.
In this way, we decorate the entire surface of the ball with pounds, carefully observing that there are no unfilled voids.
This is what your base ball, completely decorated with organza, should look like.
Step 6
Now we need to strengthen the preparation of our tree in the flower pot intended for it. To do this, dilute alabaster with water according to the instructions, carefully fill the previously selected pot with this mixture. If there is a drainage hole in the pot, it must be sealed before manipulating the alabaster.
Step 7
Now we evenly insert the blank of a tree of happiness into a pot filled with diluted alabaster. We hold the workpiece for some time to give the mixture time to harden a little, otherwise the tree will tilt to the side and the result will not be the one you expect.
Step 8
After the alabaster has completely hardened, we will cover it with sisal. We glue the sisal using hot glue.

Step 9
Now let's take beads and dried flowers and decorate the topiary.

Step 10
Then we add shells and a starfish and you can admire the result - the exquisite “Sea Breeze” topiary is ready! Many thanks to the author for the idea and detail!
What could be a better gift for a loved one than a heart? Perhaps nothing but a basket of fruit. Store shelves are filled with plush, talking, dancing, smiling hearts. But t Just look how beautiful homemade organza trees of happiness can be! They look like they are from a fairy tale! How wonderful it would be to do the same for your loved one.


We, inspired by beautiful examples, will make our own topiary in the shape of a heart. Pay attention to how important the little things and details are! Before doing the work, think carefully about the design of your tree. It’s better to even make a rough sketch.
Materials for organza topiary
1. Flower pot (small).
2. Stick for the barrel. You can use kebab skewers, thick wire, I used a simple branch that was pre-dried and painted with acrylic paint.
3. Gypsum, water.
4. A piece of thick cardboard. We cut it out in the shape of a heart.
5. Floral organza, approximately 2 meters.
6. Newspaper, toilet paper, organza-colored napkin, thread.
7. Artificial flowers.
8. Beads, satin ribbons.
9. Glue gun.
Progress
1. Connect the barrel and the workpiece with hot glue.

2. Now the heart needs to be given volume. You can line it with newspaper. napkins, toilet paper. We will coat the workpiece with glue, crumple up the newspaper and place it on the cardboard core.

3. Wrap the heart on all sides. If you get an uneven surface, you can level it by wrapping it with napkins and securing it with threads. The napkin should be chosen to match the color of the organza so that the base does not show through.

4. We fix the trunk in the pot using plaster, alabaster or cement. In short, we dilute plaster or alabaster to the state of liquid sour cream, fill the pot and quickly insert the barrel. We wait until it dries.
5. While the “foundation” is drying, let’s work on the organza. Organza topiaries take a very long time to make, so be patient. Let's cut about 40 5*5 squares.

6. Fold the square diagonally

7. And then again.

8. Let's fold the corner.

9. And on the other hand.

10. Apply a drop of hot glue and attach the resulting bag to the heart.

11. Wait until it sticks. In order not to get burned, we help ourselves with a toothpick, as in the photo.

12. Now we glue the workpiece first along the contour.

Tip: Your product will look more original if you complement it with more complex organza crafts - flowers, bows and ribbons. You will learn how to make them in the following videos.
13. And then from all sides.

14. Until the heart is completely covered with organza.

15. Now let’s attach our blanks for the heart to the plaster base. If for some reason the bags do not want to be attached to the plaster, then coat the plaster with a layer of PVA and glue several napkins in the color of the future product.

16. Fill the bottom part in the same way as filling the heart. After that, decorate with beads and a flower.

17. Final touch: tie a satin ribbon on the trunk and a bow on the pot. The topiary is ready!

We just made the perfect wedding topiary, which can be not only white, but, for example, red:

Using organza you can make truly magical trees! Which you can give not only to your other half, but also to all your loved ones: mother, child or friend! Use organza as a base, and with the help of other details create a composition or even a whole plot! For an example, look at the proposed photos! They are impressive!


Video on this topic
Well, have you already thought about what topiary you will make next? There are a million design ideas! And most importantly, all the decor can be purchased at a supermarket or craft store.


Master class: “Organza Topiary”
Author of the work: Litsova Lyudmila Tadeushovna, teacher of the Municipal Preschool Educational Institution “Kindergarten No. 10 of a combined type” in the city of Yemva.The master class is designed for children of high school age, teachers, parents and simply creative people.
Purpose: for a gift, exhibition, interior decoration.
Target: Mastering the technique of making topiary.
Tasks:
Develop imagination and creativity;
Develop fine motor skills of the hands;
Promote the development of creative thinking and imagination;
Cultivate patience and perseverance.
Progress:
Materials and tools:
Organza fabric – 2.5 m, width 70 cm,
Foam ball with a diameter of 7 cm,
stapler,
Hot glue,
glue gun,
Pot, suitable size,
Polyurethane foam,
Scissors,
Branch (snag) decorative,
Satin ribbon,
For decoration: Sisal, daisies, apple, lagurus, corrugated cardboard strips, fabric flowers.
1. Let's start our work by preparing the trunk for the topiary. To make a trunk, take a decorative driftwood.

2. Then we wrap the snag with a satin ribbon, the end of which is glued with a glue gun.

3. Take a foam ball.

4. We stick the decorated driftwood into it, having previously coated it with glue

5. Now let's take the pot.

6. We insert a snag into it, as we need it, and fill it with foam, the main thing is not to the brim, because foam tends to increase in size. Leave to harden overnight.

7. In the morning there will be such a picture.

8. Cut off excess foam.

9. Now we take organza 2-2.5 meters.

10. Cut it into squares, or into rectangles.

11. Fold them and secure them with a stapler, cutting off the tip.

12. We put our blanks in one place.

13. Take the previously prepared base and glue our organza blanks individually onto hot glue.

14. This is what should happen.

15. Now we will decorate. We take sisal and decorate the part where the polyurethane foam is visible.

16. Decorate the top with daisies.

17. Place an apple under a snag. All that remains is to decorate the pot. We decorate the top and bottom of the pot with corrugated cardboard tape, and glue a fabric flower to the center. We insert two lagurus branches on the side of the apple.

18. Our topiary is ready.
Reading time: 3 minutes
It is difficult to find an interior without a small corner of prosperity and happiness. And its symbol is the “money tree” or topiary. For production, any available material is used, and the themes of artificial trees are very diverse. If you want to give an exquisite gift for a birthday, wedding, anniversary, airy organza topiary will solve the problem.
All roads lead to Rome
 What do the topiary bushes in the park and the charming tree in a pot on the chest of drawers have in common? It turns out there is a common history that goes back to Ancient Rome. It was there that “topiary” slaves created figured hedges. The Italian Renaissance was also reflected in landscape fashion: gardens were decorated with original bushes in the shape of animals and political figures.
Since the 17th century, France has become a real trendsetter for beautiful parks, the basis of which is the art of curly pruning of green spaces. And over the following centuries, it became a sign of good taste to use the capabilities of topiary in shaping the landscape.
In the world of storey buildings, having your own garden or park is problematic. But anyone can afford to create a piece of man-made nature. This is how unusual trees migrated into the home interior.
We disassemble for spare parts
Any topiary consists of four main parts:
- the basis. The shape of the base reflects the theme of the product. Traditionally it is a ball, but it can be a square, a cone or an animal figure, the outline of a letter, or a heart. The choice of material for the base depends on the technique: if the decorative elements will be stuck in, a soft one will do; for stickers it is better to use a hard surface;
- crown. The main element for fantasy. Any fabric, beads, sequins, beads, shells are suitable for its creation. The crown is even decorated with nuts, coffee beans, colored pasta and cereals, and candies;

- trunk. A crown-shaped base is attached to this part. The main requirement is that it must be strong and easy to decorate;
- stand. Traditionally, a regular flower pot is used for the stand. However, there is no limit to imagination. A small, miniature tree can easily be fixed in a small shell or coffee cup. For a larger topiary, any container decorated in accordance with the general idea is suitable.

Before starting work, you need to think through each element. They must be combined with each other functionally and thematically, forming a complete image.
Airy organza
- beloved friend;
- for women's interior.
Inserts of bright elements will make the tree magical, complement the composition, and create a plot. The fabric is responsible for the mood and airiness of the topiary.
Funtic technique
Elements for decorating with organza are formed in several ways:
- making flowers using ready-made templates;
- ribbon flowers, leaves;
- formation of pounds.
The simplest technique for working with pound organza. Main stages of working with fabric:
- the material is cut into squares with a side of 7 (5) cm. To avoid processing the edges, use hot scissors or a special organza for floristry;
- the square is bent diagonally so that the corners do not coincide, but are offset;
- the workpiece is folded like an accordion or fan;
- The corner is fixed with a sewing pin;
- a second one is made and connected to the first using a stapler, thread,

In this way, the required number of pounds is prepared for trimming the base of the organza topiary.
Idea for Valentine's Day
 The symbol of Valentine's Day, the heart, will be a great idea for a topiary crown. Such a tree of happiness will be an original gift. To make it you will need the following materials:
- the barrel and the workpiece are glued together;
- Pounds are prepared from organza. Squares are cut into 5x5 cm format;
- using a gun, glue the pounds to the heart-shaped workpiece so as to completely cover the entire surface;
- the barrel is attached to the stand;
- the lower part of the tree is decorated with pounds.
Beads, satin ribbon bows, and butterflies will add completeness to the topiary. The middle of the heart can be filled with roses, peonies, lilies, made of organza. An original addition will be a frame with a joint photo
A little creativity
With a little imagination, you can create DIY organza topiary, organically complementing any interior:
- You will get a traditional money tree if you additionally include bags of counterfeit banknotes. Decorative coins can be used as the center of organza flowers;

- the coffee tree of happiness will be more original if the middle of the flower is made from coffee beans, and the crown is trimmed with organza;
fold the square diagonally diagonally

now by plane

on the back side we drip glue onto the corner

apply a toothpick

in half again, holding the toothpick with wet fingers. True, now I fold everything completely as it should be, open the corner a little, drip some glue and put in a toothpick.

by etoille : How I make filler (pounders) for bouquets.
Because You always want to make it simpler, more beautiful, and also cheaper, so you have to invent something. For example, how to use organza scraps and wire scraps. ..
And my last idea came out so well that I decided to post it here too, maybe you’ll pay attention.
We cut the organza on the bias so that there is no waste, into strips or petals. They brought me organza like this... a lot of pattern, little transparent... and by and large, it’s not organza at all. But it turned out to be even interesting.
(gray lines are cutting lines)

For one pound we take a thin wire, bend it in half, wrap it around the small top (I deliberately took a brighter piece) blue leaf. We make a few more twists, twist the blue leaf again... and so on 4 leaves. That's it, I have one pound. But for fluffiness, I twisted two pounds on a hairpin made of floral wire.

PS. You have to cut it on the bias so that the fabric doesn’t fray and you don’t have to burn it.
I hope it will be useful to someone.
from Duckling: Girls, it turned out that there are many options for attaching the assembly and “pounders”.
I offer my own, though.... “When you come up with a new hieroglyph, you must remember that it has most likely already been invented”
1. It all starts with a square folded diagonally, the corners can be moved

2. I fold the “pounds” as follows:


3. I secure it with a stapler.

4. Add a drop of hot glue onto one “pound”

5. Take a skewer, put it in glue and press it on top with another “pound”


6. Fingers don’t get burned; in the end we get a “pound” for the filler

If you don’t need fluffy “pounders,” you can attach one to a skewer (toothpick, wire).
I use this technique when working with mica, organza and rigid mesh.
P.S. The paperclip is not visible in the composition, checked
fromEzhka : I was asked
maybe it will be useful to someone else


the mesh is fluffed equally on all sides, stretched diagonally and tied, and then bent and tied again. Apply glue to the skewer, insert it into the mesh and press well (it springs) so that the mesh is glued.
When you need long fluffs, I fluff the mesh more on both sides, and a little on the other two, so that there is no “hedgehog” later, the rest of the fasteners are the same


here are both options
This is how we deal with waste


three options, but I tie it not with braid, but with the same threads. And small threads can be used for glue in a grass pot

fromOlgucha : I’ll show you here step by step what I did, maybe it will be useful to someone.
First, I cut 12x12 squares and pierced them in the middle with a skewer

then I threaded one square onto a skewer and coated the skewer with glue

clamped, pressing the edges of the square to the top

this is how the pound turned out

and so on one by one

Well, here's the end result

For my taste it turned out to be very lush, I think the squares should be 10x10, maybe even smaller.
 Cool Corner Templates
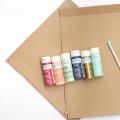 How to make letters for a wedding photo shoot
 Antenna master - antenna repair