Make letters from various materials with your own hands. How to make letters for a wedding photo shoot. Frame for the figure
Volumetric letters can be useful for decorating a room or be a mandatory attribute at a party (for example, the initials of the bride and groom at a wedding). We offer you several master classes on how to make three-dimensional letters with your own hands. Schemes and templates for their manufacture can easily be made independently.
What types of three-dimensional letters are there?
Do-it-yourself volumetric letters can be made from the following materials:
- Paper (for example, cardboard). Such letters are most often empty inside and very light. Suitable as room decor (they can be hung on the wall), holiday attribute or photography.
- Fabrics (cotton, satin, felt, etc.). Such letters turn out to be very soft, so they are suitable not only as decoration and for photography, but they can also be used as beautiful and original pillows.
- Foam plastic. Such letters are distinguished by the fact that they can easily be decorated with almost any material (for example, paints, ribbons, paper, flowers, rhinestones, and so on). They are as light as three-dimensional paper letters.
You can make templates with your own hands on plain paper. The purpose of their creation is to imagine what the final result will look like, correctly calculate the dimensions and choose the font.
What is needed to create three-dimensional letters from cardboard?
First of all, you need thick cardboard. By the way, it is not necessary to buy it. Boxes from household appliances and plumbing fixtures will also work.

You also need to take:
- PVA putty;
- color;
- putty knife;
- scotch;
- scissors;
- stationery knife;
- a long ruler (at least thirty centimeters);
- pencil;
- sandpaper (fine-grained).
Operating procedure
Step-by-step instructions on how to make three-dimensional letters with your own hands from paper:

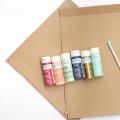
- Using a pencil and ruler, draw the front and back of the letter on the cardboard.
- Draw the sides of the letter next to each other. Make the length with a margin, and the width - any. If you want the letter to be able to be used independently, then the size should be approximately 1:4 (for example, the height of the letter is 20 centimeters and the width is 5 centimeters).
- Take the tape and glue the side flap to one side of the letter. Then glue the other part.
- Set the tone of the putty. To do this, add color to it. Remember that when the putty on the paper dries, it will become slightly lighter than in the jar.
- Using a spatula, apply putty to the entire letter. Don't forget to caulk the joints.
- Let the putty dry. This will take about twelve hours.
- Gently smooth out any uneven surfaces using fine-grained sandpaper.
Three-dimensional letters made of cardboard, made by hand, are ready.
Foam letters
You will need:
- Styrofoam;
- PVA glue;
- brush;
- a large stationery knife (it is advisable to insert a new sharp blade);
- covering material (for example, wallpaper, newspapers, colored paper, etc.);
- decor (for example, satin ribbon).
Polystyrene foam can be purchased at almost any hardware store or you can take the one left over after purchasing large household appliances.
Master class on making
Creating foam letters requires some effort. And every step is performed very carefully. Otherwise, the figures will turn out sloppy and may even break.

Step-by-step instruction:
- Take the foam and cut it into equal pieces. One rectangle - one letter.
- If you have thin foam, then glue it in at least three layers. You can only use PVA or assembly glue; you cannot use superglue (for example, “Moment”), since its composition will corrode the foam.
- Draw a letter design on each piece of foam. To do this, use a ruler and pencil. The simpler the font (meaning no curls), the simpler and neater the work will be.
- Cut out the letters with a utility knife. Movements must be confident and firm.
- You cannot leave the letters unprocessed, since the edges will still turn out uneven, no matter how carefully you work. Therefore, they need to be decorated. For example, cover them with paper.
- Wait until the letters are completely dry.
If you want the letters to become wedding paraphernalia, then decorate them with beautiful decoupage paper, flowers or satin ribbons. Three-dimensional letters for a wedding, made by yourself, are ready!
Fabric letters
Fabric letters can be either hard or soft.
To create solids you will need to take the following tools and materials:
- cardboard or foam;
- scissors;
- stationery knife;
- pencil;
- ruler;
- scotch;
- special glue gun;
- beautiful fabric.
To create soft letters you will need to take the following tools and materials:
- fabric (for example, cotton, felt, etc.);
- filler (for example, padding polyester, padding polyester, cotton wool, holofiber, air fluff, cereal, and so on);
- tailor's scissors;
- a needle;
- threads;
- sewing machine (if you have one, it will greatly facilitate the work process).
Master class on creating solid type from fabric
Step-by-step instructions on how to make three-dimensional letters with your own hands from paper or foam, which are then covered with fabric:

- First of all, take cardboard, a pencil and a ruler. Draw the letter pattern. Remember that you will need a front and back piece, as well as a side piece.
- Using scissors, cut out all the cardboard elements needed to create the letters.
- If you are making letters from foam, cut the material into as many pieces as you need letters. Draw a letter template on each of them. After this, cut out the shapes with a stationery knife with a sharp blade.
- Lay out a piece of fabric with the reverse side in front of you.
- Draw letters on the fabric. Each must be in two copies (front and back). Moreover, they will be larger in size than the finished figures. The sides are taken into account here. For example, if the width of the letter is ten centimeters, and the side is five centimeters, then the size of the template on the fabric should be thirteen to fourteen centimeters.
- Cut out parts for the product from fabric.
- Warm up the glue gun.
- Carefully glue the fabric to the cardboard or foam model. First one side is glued, then the other. The fabric joints are carefully smoothed out.
- Cover all the letters in the same way.
Solid volumetric fabric letters are ready!
Master class on creating soft letters from fabric
Step-by-step instructions on how to make soft letters from fabric:

- Place the fabric with the reverse side in front of you. Draw the outlines of the product on it with chalk. For each letter you will need three parts - two sides (front and back) and one side.
- Cut out all the details from the fabric. Don't forget to make a small indent from the edge (for example, if it is cotton or silk, then it will be one or two centimeters, if it is felt, then the indent can be less). This is necessary so that the seams do not come apart over time and the fabric does not fray.
- Sew the side piece to one side of the letter. You need to stitch with the wrong side of the fabric.
- After this, sew one more side to the two parts. Leave a small hole through which you can then turn the product inside out and fill it.
- Line up all the letters.
- Turn the workpiece right side out. To make it more convenient, you can use a stick.
- Push filler into each letter. Distribute it evenly around the entire perimeter of the figure. To push the filler into the corners, use the stick again.
- Sew up the holes carefully with a hidden stitch.
Volumetric soft letters are ready.
They can be decorated if desired. For example, sew on ribbons or bows. Such letters will be both beautiful and useful. You can even sleep on them!

- Foam letters can be painted only after applying a layer of white putty. Otherwise, the paint will simply be absorbed into the material.
- You can decorate letters made of foam or fabric with flowers (real or artificial).
- Do-it-yourself volumetric letters for a wedding can be made from any material. The main task is to arrange them correctly. The best way to decorate such letters is with beautiful decoupage paper, pasting them with fabric or thread, or inserting flowers into them (it’s better if they are real and not artificial).
- You can use twine or any other cord to decorate bulk products made of cardboard or polystyrene. To do this, smear the sides of the figure with glue, then wrap it tightly with lace.
- Bright and shiny volumetric letters will be obtained if they are covered with sparkles or rhinestones. To make them hold tighter, use a glue gun.
We wish you creative success!
Increasingly, you can see unusual decorative elements in the interior - letters or entire inscriptions from them. Naturally, many construction and design firms immediately picked up this idea and began producing similar jewelry. But those decorative accessories that are made independently are considered more interesting, valuable and significant, and they are not so difficult to make.
Naturally, it is impossible to make jewelry from metal or plastic without equipment, but there are many materials that are quite affordable and easy to process. What and how to make a three-dimensional letter with your own hands, so that it is unique and inimitable, and therefore distinguishes your home, we will tell you below.
Textile
The most common way to make three-dimensional letters with your own hands is to make them from fabric and filler. For those who are at least somewhat familiar with a sewing machine or even thread and needle, making soft letters will not be much of a problem. They can be small in size, when for decoration they are strung on a thread or fishing line and words are formed, or large in size when they are used as floor pillows. But the most popular size of such products is considered to be medium size, like regular sofa pillows.

To make three-dimensional letters from textiles with your own hands, you need:
- choose a fabric that matches the overall style of the room,
- make a stencil of the required letters,
- transfer the stencil onto the fabric using cardboard,
- cut out two blanks (note that on one side the stencil should be applied directly, and on the other - in a mirror image, i.e. upside down),
- sew them together in the most primitive way.
This can be done by hand or by machine, depending on your sewing skills. As the letter is stitched, the free space in it is filled with scraps of fabric, foam rubber, padding polyester or cotton wool. It is worth choosing fabric and threads that are strong enough so that such a letter does not need to be repaired frequently.
You can join the fabric with any type of seams, leaving them outside or inside, turning the letter inside out at the same time. You can decorate such pads in different ways: sew on buttons, lace, glue on various butterflies, pebbles or flowers. For children, you can “revive” these letters by gluing eyes, nose, tongue, hair to them and designating arms and legs using threads. Decorating a finished pillow gives you complete freedom to your imagination.

Cardboard
There are various ways you can make letters out of cardboard with your own hands. To do this, you will also need a stencil with a letter of the exact font that you would like to see on your shelf or wall. As a tip for beginners, it is worth noting that it is better to choose a simple font in a classic sans serif style. Once this becomes easy to achieve, you can move on to decorative or serif fonts.
After making a stencil, it is used to transfer the image onto thick thick paper, regular or corrugated cardboard. And then the manufacturing technology may differ.
The first method is somewhat simpler: to make three-dimensional letters from cardboard with your own hands, just wrap them with wool or other thick threads. Then you can decorate such accessories using flowers knitted from the same threads, shells, pebbles or beads.

The second option is somewhat more complicated, but the result is not soft, but real classic letters that will decorate both classic and minimalist interiors. To do this, you also need to prepare letter stencils and cut out two parts. If the letters have holes, they need to be cut with a utility knife and then cut out with scissors. For the edge of the product, you need to cut a strip of cardboard, which should be three to four centimeters thicker than the thickness of the product. Using a pen where the ink has run out, we press through the fold lines with which the parts will be connected. Next you need to bend the cardboard along these lines. Then one part is glued to the edge of the product (to make gluing more convenient, in the part of the letter where the lines are smooth, the fold of the edge should often be cut with scissors). After connecting the first part of the letter to the edge, the second part is glued in the same way. The entire product is placed under a press for some time (a couple of hours is enough).
After making a letter from cardboard with your own hands, you need to decorate it. You can cover the top of the cardboard with white paper - such a letter will fit into a minimalist design. Or you can make the letter brighter: sprinkle glitter on top of a layer of glue, use beads, shells, bows, gift ribbons, wrapping paper, etc. To make a letter fit a certain interior style or individual pieces of furniture, you can paint it yourself.

It is in this way that the letters used at holidays are created. At anniversaries these can be numbers, at weddings - the names of the newlyweds or individual words “Love”, “Happiness”, etc.
The third way to make any shapes using cardboard and paper, including letters or numbers, is the papier-mâché technique. To do this, you first need to draw a word or letter in duplicate, and then fasten them together so that they are at an equal distance from each other. Some craftsmen fill this space with paper cups, gluing the top and bottom of each cup and thereby fastening the two parts together. You can use cardboards of the same length to glue the parts together. On top of this, the product is pasted over with cut pieces of paper or newspaper, as is usually done using the papier-mâché technique. The finished part can be decorated with painting, appliqué, or using the decoupage technique. Such unusual decorations as pasta in the form of shells or stars will look original.

Tree
Another popular material for creating letters and inscriptions is wood. You can make your own wooden letters from blocks of wood or plywood, which is much easier. True, letters made of plywood will turn out to be flat, but with the help of decorations, for example, natural materials (cones, acorns, etc.), it is easy to give them additional volume.
To make wooden letters with your own hands, you also need a stencil. It is transferred to plywood and then cut out with a jigsaw. After the product is ready, it is worth treating it with sandpaper to avoid any unevenness or splinters. Such letters are usually first painted and then decorated with any materials. After finishing the work, it is better to coat the product with varnish so that the wood is protected from moisture.

Styrofoam
If you have enough material, you can make letters from foam plastic with your own hands. You can buy polystyrene foam in the store in sheets or find boxes from household appliances, where there is often quite a lot of it. The technology for making beech from it is the same as for wooden letters: first, using a stencil, the image is transferred to a sheet of foam plastic, then the product is sawed out using a jigsaw (you can use a construction knife), and then carefully processed with fine sandpaper so that there are no defects, and the surface became perfectly smooth.
When decorating foam letters with your own hands, you usually first apply two layers of paint to all surfaces of the product, and then use light decorations: lace, tulle trim, burlap, thread, etc. To decorate letters from foam plastic, you can make small flowers, ladybugs, butterflies or other accessories with your own hands, but you should not glue them with glue. It can corrode foam. It is better to use rubber glue - it is safe for the product.

Wine corks
Another option for making a three-dimensional letter with your own hands is a product made from wine corks. In the modern world, nothing is surprising anymore, but using so-called waste to create interesting things is a great idea. The plugs can be glued together with regular or super glue. You can change the direction of the plugs by gluing them first with edges and then directly. Such products are decorated with paints, appliqué, dried flowers and any other methods.

Gypsum
You can use plaster to create interior three-dimensional letters with your own hands. It is better to work with plaster while wearing gloves. To create letters from plaster, you need to prepare a mold into which the prepared solution will be poured. To do this, you need to draw the desired letters on cardboard, and then cut out long strips that are equal to the thickness of the product. These strips need to be glued to the cardboard along the contours of the letters to form a cavity into which the plaster will be poured. It is advisable to glue the inside of the mold with tape - this will make it easier to remove the part after it hardens.
To prepare gypsum, strictly follow all recommendations on the packaging. It should generally have a yogurt-like consistency. First, the mold is half filled with solution. Then a layer of burlap is laid on top to strengthen the future product. Then the product is filled to the end, i.e. to the top of the form.
Typically, plaster hardens completely after 4-5 hours. After this, you need to use a knife to remove the product from the mold. Then the surface is sanded with sandpaper, the corners are cut off and irregularities are removed.
Usually such letters are not decorated, but left white. But it’s not necessary: they can be coated with paint or decorated with some cute little things. To prevent such decorations from getting dirty, they should be sprayed with acrylic spray.

You can also mention creating letters for the interior from salt dough, which you can do with your children.

Some people cast letters from wax to create chic candles. Those who are interested in modeling are quite capable of making letters from clay. There are really many options for creating unique decorative elements.

By decorating such products with an LED strip or a regular New Year's garland, you can create a creative lamp for the bedroom, and by placing small volumetric letters made of fabric on a large canvas, you can get a chic panel. Use your imagination - and you will be able to decorate your home in an unusual way!
The popularity of three-dimensional letters in the interior or inscriptions from them is increasing. Because of this, many design and construction companies began to provide such decoration services. But of course, it is much better and more interesting to make such letters yourself, especially since the manufacturing process is not very complicated.
Of course, this does not apply to working on plastic or metal; they require special equipment. But there are many materials that are quite suitable for independent processing. We will look at them and methods for making letters with our own hands that can profitably decorate your apartment in this article.
Textile
The most popular material for making letters with your own hands is fabric and its filler. If you have at least minimal skills in working with a needle and thread or with a sewing machine, then it will not be difficult for you to make soft letters. They can be made small if they are then strung on a fishing line or thread to make words, and large if you decide to get a floor pillow in this form. The most common option is medium-sized sofa cushions.
When working on making your own letters, you will need to follow these steps:
Choose the fabric most suitable for the interior,
- make a stencil for future letters,
- transfer it to the fabric, helping yourself with a piece of cardboard,
- make a couple of blanks (on one side you need to apply the stencil directly, on the other it needs to be turned over, that is, placed in a mirror image),
- then sew them together using the most basic method.
This can be done using a sewing machine or by hand. You need to fill the space between the pieces of fabric with padding polyester, fabric scraps, cotton wool or foam rubber. Use the most durable materials so that in the future you do not have to resort to frequent repairs of the final result.
You can sew the fabric in a variety of ways; the seams can be left inside or outside, while simultaneously turning the product inside out. You can decorate it with lace, stones, buttons, butterflies or flowers. If you want to make children happy, then glue a tongue, eyes, hair, nose to it and make symbolic legs and arms with threads. In the final stage, you don't have to limit your imagination.
Cardboard
You can make cardboard letters with your own hands in a variety of ways. For this purpose, you need to keep on hand a stencil that will depict a letter with the font that you want to see on the wall or shelf. For beginners, it is best to choose a classic font without serifs for this purpose. Once you have mastered this skill, you can move on to more original fonts. Using a stencil, transfer the image onto corrugated or regular cardboard or thick thick paper. Then wrap the cardboard blank with wool or other thick threads. Then decorate the result with flowers made from the same threads, pebbles, shells or beads.

There is a second way to make letters from cardboard, it is more difficult, but using it you can make full-fledged, and not just soft, products. So, with a little more effort, you can qualitatively decorate both a minimalist and a classic interior. To do this, you also need to make stencils and cut out a couple of parts. If you want to make a letter with holes, then cut them with a stationery knife, and then cut them out with scissors. For the ribs, cut out a strip of cardboard; it should be three to four centimeters thicker than the letter itself. Now take a pen without ink and use it to press down the fold lines along which the parts will be connected. Bend the cardboard over them. Glue the part to the edge of the letter (to make this step more convenient, cut the fold of the edge as you work in the part of the product where the lines are smooth). After you glue the rib and the first part of the product, proceed in the same way with the second part. Then place the letter under the press for two hours.
Then you can start decorating the finished product, made by yourself. If your interior is designed in a minimalist style, then simply cover it with white paper. And to make the letter more colorful, decorate it with glitter, shells, gift ribbons, beads, wrapping paper, gift ribbons and other materials. You can also paint it to make it more suitable for individual pieces of furniture or a specific interior design style.

Using this more complex method, letters are made to decorate holidays. When celebrating weddings, they can include the words “Happiness”, “Love” and others, as well as the names of the spouses. In the case of anniversaries, there may also be not letters, but numbers made using the same technique. There is another way to make numbers and letters from cardboard - papier-mâché. To make a product using this method, make a drawing of what you have in mind in the amount of two pieces, and connect them to each other. To do this, some people do this: they take paper cups and smear their tops and bottoms with glue. You can also take pieces of cardboard of the same size for gluing. Then cover the product with newspapers or pieces of paper and decorate it with applique, painting, or using decoupage.
Tree
Another fairly common material for making letters is wood. The easiest way to do this is to use blocks of wood or plywood. You just need to remember that in order for the plywood letter to be voluminous, it will need to be decorated, for example, with acorns or pine cones. Once production begins, you will also need a stencil. Transfer it to a piece of plywood and cut it out with a jigsaw. Go over the resulting letter with sandpaper to get rid of splinters and irregularities. After this, it can be coated with paint and decorated with some materials. Then make it moisture-resistant by treating it with varnish.

Styrofoam
If you have enough material, you can make your own foam letters. You can find it either in specialized stores or in boxes of equipment. Letters are made from it, just like from wood. Using a stencil, transfer the design onto the foam plastic, and then cut it out with a construction knife or jigsaw. Now take fine sandpaper, use it to smooth and clean the product. When decorating such letters yourself, you must first cover them with two layers of paint. After this, you can cover it with tulle, burlap, lace, thread and other materials. Plus, you can decorate the letters with handmade ladybugs, small flowers, butterflies, etc. Under no circumstances use Moment glue for this; it is destructive to foam plastic. Take rubber glue for this.

Gypsum
Gypsum can also be suitable for making letters with your own hands. Just stock up on gloves for this. Make a form into which you will need to pour the solution. Draw a drawing of the letters on a piece of cardboard and cut out long strips that are as thick as the letter. Glue them along the contours onto the cardboard; this will create a cavity that will need to be filled with plaster. Before doing this, it is best to cover the cavity with tape so that there are no special difficulties when removing the part when it hardens. When mixing gypsum, strictly follow the manufacturer's recommendations indicated on the container.

A properly made solution will most likely be similar in consistency to yogurt. Fill the form halfway with it. Place a piece of burlap on top, and then fill the solution to the top. Wait 4-5 hours for the solution to harden. Take a knife and use it to remove the plaster from the mold. Go over it with sandpaper to remove any bumps and unnecessary corners.
In most cases, after this the work on the plaster letters is completed. If you don’t want to, you can paint them and also decorate them with some small details. To avoid contamination, coat them with acrylic spray.
We invite you to watch a short video about the easy process of making three-dimensional letters:
An original home decoration in the form of three-dimensional pillow letters is very popular among needlewomen. They are made from various fabrics and use filler to give them shape. Typically, these interior items are made in the form of the first letters or full names of newborns. They are placed in a children's room or living room.
An original home decoration in the form of three-dimensional pillow letters is very popular among needlewomen
For those who have never tried to sew such home accessories, the work may seem complicated and requires investment, but in fact, making pillows in the form of soft letters is very simple. Even a beginner can cope with this task.
For sewing you will need:
- fabric of the same color or contrasting shades;
- synthetic filler;
- threads to match the material;
- scissors;
- sewing machine for making straight seams and processing them;
- pattern paper;
- ruler 50 cm;
- pencil;
- safety pins;
- chalk for transferring the pattern onto the fabric.
If you don’t have a sewing machine at home, you can try to make pillow letters with your own hands, but this will be a very lengthy process, since the size of the products is expected to be rather large. In addition, it is better to overcast the seams to prevent the fabric from fraying and unraveling during use.
How to sew a pillow letter step by step (video)
DIY pillow letters: what fabric to use?
Preferences regarding material for crafts are individual, but most often they settle on the following options:
- cotton;
- fleece;
- knitwear;
- fabric for upholstery: microsuede or flock.
The main requirement is density. The material must be resistant to wear, since in a children's room the pillows will experience a lot of stress. You can use old stocks of fabric left over from sewing bed linen or other things.

Preferences regarding material for crafts are individual.
It is important to choose the color. If the letters will be placed in a specific room, you should take into account the prevailing tones there. Products must be combined with wallpaper or furniture. As a base, it is better to choose fabric with patterns in the form of stripes, polka dots, flowers, etc.
The sides that connect the front parts of the pillows can be plain. If the letters perform a developmental function, and elements in the form of buttons, satin ribbons, snaps and other devices for working on fine motor skills will subsequently be sewn onto them, you should choose a material without a pattern for all parts.
What sizes should I choose?
When determining the parameters of letters, you can be guided by different considerations. The letters can be different M, L, F, it doesn’t matter, the sizes and sewing techniques are the same. If there is a limited amount of material for making personalized pillows, you should use a pattern of the appropriate size.
Much also depends on the location of the finished products:
- bumpers for a crib;
- accessories for a sofa or ottoman;
- decor for the room on which the child will sit or lie.

When determining the parameters of letters, you can be guided by different considerations
The classic size of soft letters is 40x35 cm. But if desired, they can be made larger or smaller. On the Internet you can download ready-made diagrams for heights of 20 and 30 cm.
How to sew letters of the Russian alphabet: patterns
The process of creating a stencil is simple. You can use a pencil and ruler or print it out.
The last option will be the fastest and most accurate:
- In the Word editor, select a letter and give it the necessary parameters. You can also download a ready-made template and specify the required height when printing. Most likely, you will have to break the stencil into several sheets.
- The printed pattern is cut out and the parts are glued together. The result will be a letter in natural size.
- To make it last longer, attach it with glue to cardboard or thicker paper.
- All ready-made stencils for one name should be placed side by side and imagine what the finished pillows will look like.
- If you want to slightly change the shape of the letters, corrections can be easily made by highlighting unnecessary elements with a pencil and cutting them with scissors.
- The sides are made in the form of strips from 5 to 8 cm wide, taking into account that about 8 mm from each edge will go to the seams.
After the patterns are ready, the creation of the masterpiece begins.
Sew the letter "N"
For the classic version of a 40x35 cm pillow, you will need a piece of material of any color, 1 m long and 70 cm wide. You can take it with a reserve so that there is enough for the sides.

- The fabric is folded in half with the right side inward. Place the pattern on top, secure it with safety pins and trace it with tailor's chalk or a simple pencil. After adding another 1 cm around the perimeter for seam allowances, draw a line along the contour again.
- Cut out the blanks. Strips 5-8 cm wide are made from leftover fabric or other contrasting material, not forgetting to also add 1 cm at the edges. The length is determined by measuring the letter along the outer and inner boundaries with a centimeter.
- Using a machine, the side panel is attached to one side of the “H”. Then the second part is attached in the same way. Don't forget to leave a small hole to turn the pillowcase inside out and fill the pillow with filling.
The slot is closed with a blind seam by hand. The soft letter “H” is ready. It can be used on its own or you can add the rest of the elements that make up the child’s name. If the sewing machine has an embroidery function, you can also place the baby’s full name on the side before sewing the parts together.
Sewing a bagel: master class
Before you start making soft letters, you can practice on a simpler and equally popular product with children - a donut. The scheme of its creation is clear even to a child.
To sew a round pillow with a diameter of 40 cm with a hole in the middle you will need:
- thick paper for making a stencil;
- threads;
- pencil;
- scissors;
- plain light material for the base 50x100 cm;
- pink fabric for decoration 40x40 cm;
- sewing machine;
- safety pins;
- multi-colored fun-shaped buttons.
The color of the base and decor can be changed at your discretion.

Before you start making soft letters, you can practice on a simpler and equally popular product with children - a donut
Constructing a donut pattern:
- A sheet of paper measuring 50x50 cm is folded in half twice.
- One end of a simple spool of thread is tied to the pencil.
- Using a ruler, measure 20 cm from the edge of the sheet and pull the thread to this length.
- Next, applying its opposite edge to the corner of the square where the fold is located, using the principle of a compass, draw a smooth line with a pencil.
- It turns out to be a fourth part of the circle.
- Cut off excess edges.
- Fold the resulting figure diagonally.
- Measure and cut 3 cm from the corner - this will be the hole for the donut.
- Fold the paper back and the template is ready.
Preparatory stage:
- The fabric is folded in half with the right side inward.
- The pattern is secured on top with safety pins.
- Outline the shape with a pencil and draw another circle at a distance of approximately 1 cm from the template. This is not necessary if you can cut the fabric evenly by eye, taking into account the seam allowances.
- The location of the hole is also marked, but there is no need to cut it at this stage.
Decorative element:
Edible bagels are usually topped with sweet cream. The pillow should be no exception. For this purpose, a piece of pink fabric was prepared in advance.
- Fold the template again into a triangle and make the inner hole 3 cm wider.
- Straighten the paper and give the edges a wavy shape, drawing by hand, cutting off the excess.
- Place the pattern on the wrong side of the material for the “cream”, trace and cut out everything, including the hole in the middle, without seam allowances.
Connection of parts:
- A piece of pink material is attached to the front side of one half of the base, aligning in the middle.
- Fasten the fabric with pins and attach the “cream” using a machine using a zigzag.
- Fold both parts of the base face inward and stitch the edges, leaving an opening of about 15 cm.
- The place where the donut hole will be is also stitched along the drawn contour. Then make crosswise cuts and carefully cut out the excess material, retreating about 1 cm from the machine stitch. To ensure that the fabric subsequently lies flat, the tips of the scissors make neat cuts no longer than 6 mm at a short distance from each other.
- Turn the pillowcase inside out and stuff it with padding polyester or other available filler to the desired degree of elasticity.
- Using a blind stitch, sew up the remaining hole by hand.
The resulting cute bagel lacks sprinkles. It is made by attaching multi-colored buttons in random order to a pink background. This pillow will become the most favorite item for a child and his little guests.
DIY letters in the interior began to be used more and more often.
And for good reason, because global trends in interior design hint at their universal recognition and popularity.
Of course, manufacturers of decorative elements did not stand aside and began to actively produce them for furniture, walls and everything where it could fit perfectly.
The choice in themed stores that offer unusual decorations for the home is undoubtedly wide, but only with your own hands can you make something unique, completely different from everything else.
By the way, the price of finished products made from letters is usually high, and this is another reason to take up such an unusual handicraft.
What letters can be made of:
- fabrics;
- wood;
- letters in the interior made of cardboard;
- felt;
- do-it-yourself letters from paper;
- polystyrene foam;
- wine corks.
The list goes on for a long time, because letters are made from almost anything that can be cut, glued, or sewn.
Most often, do-it-yourself letters in the interior are used in children's rooms, but in the living room they will definitely not be an exception if desired.

Cardboard letters
Cardboard letters are rightfully considered the most popular. If you go to a decorative store, the letter decorations will be either cardboard or wood.
You can easily make cardboard letters yourself: you just need to make cutouts of the appropriate sizes, stock up on glue that is used for fastening - and that’s it, the letter is ready.
In the matter of creating letters, what will be composed of them is also important. Here you either write a word or simply create a set of letters.
A very original option would be to create letters in the alphabet, especially if they have different colors.

However, regarding colors, you should approach this issue carefully.
First of all, decide in what places the letters will be placed in the interior, and what role they will play.
If you plan to hang them on strings, the letters should be large and dense. Their colors should not contrast strongly with the main colors in the interior.
For example, if the dominant color in the room is beige and brown, then the letters can be bright. If the furniture is bright, the letters, on the contrary, are better to choose more neutral ones. can also be done using cardboard letters, which can be easily secured with needles without damaging the wallpaper.
Cardboard, like any paper, is easy to color. Of course, it is initially difficult to find cardboard sheets with bright colors, and applying watercolors does not always give the desired effect.
.jpg)
To give cardboard letters a bright and even color, cover it with colored paper. However, this should be done before starting to work on the folds, enveloping all the cardboard fibers.
Felt letters
Compared to letters made from cardboard, letters made from felt are somewhat more difficult to make.
To do this, you need to take felt and cut it according to the given patterns, leaving about a centimeter of fabric for the seams.
As a rule, the seams are not made on the inside, that is, they are not tucked in, but beautifully framed using a sewing machine or by hand.
You shouldn’t think that hand-stitching letters can ruin the item; on the contrary, it will add a certain touch of homely mood.
Felt letters must be filled with filler or left flat. The simplest and most suitable is cotton wool, which will hold its shape perfectly and easily align with the internal cavity of the letter.

Paper letters
You don’t need to try too hard here, just cut out the letters and attach them to the wallpaper with a needle, or, if the walls are covered with paint, secure them with tape. This decoration can be easily removed if the baby gets tired of it.

A very original option when decorating a room would be paper letters used as pendants. They are decorated with paints, sewn with beads, beads and rhinestones, thereby creating the necessary and suitable style.
Foam letters
Polystyrene foam is a rather interesting material for creativity. You can easily cut out the necessary shapes from it, but you will need a sharp special knife for this.
But at the end you will get smooth and beautiful letters made of polystyrene foam, which will not require gluing or measuring. In the case of polystyrene foam, you have less chance of making mistakes; here you only need to maintain the lines, which must be marked in advance with a pencil.
The letters are made of polystyrene foam or newspaper, but the most original option would be to design them with threads.
The fact is that polystyrene foam, like wood, holds its shape perfectly and does not give in to deformation, as cardboard or paper does, so it can be wrapped in thick layers, as you please. And no one will ever guess that your letters are foam!

Whether you make the letters from foam plastic, paper or cardboard does not matter, the main thing is that your interior will be interestingly decorated.
 How to make letters for a wedding photo shoot
 Antenna master - antenna repair
 Is polyphosphate filter harmful to humans Sodium polyphosphate for washing machines