Ready-made stencils for graffiti. Stencil graffiti. Instructions for a beginner. Where to get templates
|
Surely you've met graffiti, including even identical repeating elements in the form of patterns, or saw laconic beautiful emblems, posters, logos, pictures applied to the wall every 30 steps. To create such images, stencils are used, usually made by hand. Even graffiti artists who work in various techniques often use stencils to apply individual elements or small details of compositional designs. After all, perhaps you need to make a stencil to apply advertisements to the asphalt sidewalks of the city under the cover of darkness? We will not judge you, but rather tell you how to correctly and simply make a stencil for working with aerosol paints. |
What surfaces can stencil graffiti be applied to?
If you work with aerosol paints, the main requirement for the surface is that it must have a dense structure, be smooth and dry. Naturally, the main area of graffiti is asphalt and walls, both brick and plastered. In addition, stencil graffiti fits perfectly on stone, metal, smooth wooden surfaces, plastic shields, various types of glass, including advertising stands, bus stops and store windows :)
Stencil images should not be applied to wet surfaces, as the paint will not adhere and will peel off within a few days (weeks).
What to make a graffiti stencil from?
Depending on how many times you plan to use the stencil, it could be: - a stencil for one-time application of graffiti
- stencil for repeated application of graffiti and images
Disposable graffiti stencil
Self-adhesive film is ideal for one-time application of graffiti using a stencil and aerosol paints. You can use such a stencil only once, but due to the absolute adhesion of the film and the wall, the image will be of very high quality, the outline will be clear, you will be able to avoid drips and blurred boundaries.
As a lower quality option, thick paper (whatman paper), wax paper, or thin cardboard are suitable.
How to make a graffiti stencil?
1 Draw the desired image on a piece of paper. If you want to use a ready-made image, for example, found on the Internet or made in Photoshop, print it. Trace all the outlines you plan to cut with a marker.If this is your first graffiti stencil, then try not to make it too complex, do not overload it with a large number of elements and complex details. 2 If you decide to laminate your image, go ahead to the nearest point where lamination is done. If you are making a stencil from self-adhesive film, plastic, acetate, etc., then attach your finished drawing to its surface using paper masking tape or tape. You can even glue it to several points so that the sheet of paper does not move along the surface of the material. 3 To cut out the contours, use very sharp tools - a scalpel, a construction knife, a straight razor. Something can be cut with scissors.
Cut with confident, fast, even movements. Be careful and careful when cutting rounded elements and sharp corners 4 Some straight edges of the reusable graffiti stencil can be reinforced with tape. To do this, take a piece of tape 6–10 cm long (depending on the pattern and distances), press the middle of the tape to the cut out border of the outline, and bend the edges onto the inner and outer surfaces of the stencil 5 Don’t forget about a good backing for cutting, otherwise you can strip the entire surface , on which they began to cut a stencil. You can use a cutting board or an old magazine for this.
Applying graffiti using a stencil
1 Before applying graffiti, secure the stencil well to the surface. If the stencil is made of self-adhesive, there are no questions, but if it is paper, cardboard or plastic (and you still have a little experience) - use masking tape to secure the stencil. If you see that in some places the stencil lags behind the surface, press it with your hand. With time and experience, you will learn to simply hold the stencil and still get a quality image.2 I hope you have thought about choosing paint in advance. Nowadays, graffiti uses acrylic spray paint in cans and cans. It was much more difficult for craftsmen who started working in the 90s - then there were literally a dozen colors of paint on sale, but now you will find a huge number of colors and shades, as well as metallic, fluorescent, pearlescent, textured and many others 3 Remove the stencil immediately , as soon as you have finished applying the paint. If this is a reusable stencil, then wipe off the paint from the edges of the stencil with a rag - dry or dampened with white spirit - and you can use it again
Notes and Cautions
If you are applying the same image in several different colors, it is advisable to have separate stencils for each color.
If you are applying different colors on a stencil within the same image, then before applying the next color (elements of a different color), wait until the previous paint has dried
Laminated and plastic stencils can (and should) be cleaned after each use
We are glad that our article was useful to you.
 |
 |
 |
 |
 |
 |
 |
 |
 |
 |
Visitors to this page most often choose from the online store:
Often, graffiti stencils are templates for a simple one-color design. When combined with small inscriptions or standard graffiti, it usually looks very impressive. Yes, and citizens perceive it somehow differently. But there are also complex multi-colored stencils, although their use requires the hand of an experienced craftsman.
Why do more and more writers prefer stencils for graffiti? The answer to this question is ambiguous. On the one hand, thanks to the template, the writer no longer has high demands on knowledge of the basics of drawing and the skills of a painter. On the other hand, the main idea and beauty are not lost from this method. The advantage of stencils is that they save time: using a good template, there is no need to draw lines for a long time. Speaking of the result, there is also a nice bonus here - the strokes and shapes are more correct, and the drawing is of higher quality. In addition, you can use one stencil several times - another tick in favor of stencil.
But it also has its drawbacks. Firstly, the graffiti templates themselves are large and can be inconvenient to carry around. Secondly: it will take you time to make them. In what quantity depends only on you. But when buying ready-made stencils for graffiti, there is a possibility that the finished design will not be original. How to make a graffiti stencil? If you have artistic taste, you can try making a stencil yourself. There is a lot of completely different information on the Internet on the topic of making templates. Although, with good skill and a little experience, over time you will not have any difficulties creating them.
How to make a graffiti stencil with your own hands? First, prepare: gloves, a sharp utility knife, good cardboard and a printer. Instead of a printer, a black gel pen may also work. With its help, we simply draw a drawing on cardboard. But experts in the field assure that it’s better to still use a printer; the lines will be smoother. Of course, there is another option - the drawing can be sent to a printing house. But we decided to do everything ourselves, which means we’ll try to get by on our own. We find a picture we like on the Internet, preferably a monochromatic one, or we draw it ourselves in Photoshop what we would like to see on “street canvases.” Then we print it out and attach it to cardboard. Be careful and maintain geometric proportions, otherwise the template will turn out crooked. We trace the contours of our drawing using ordinary carbon paper on cardboard. After this, we remove the sketch and carefully trace the lines with a marker or pen. The procedure must be done with gloves to avoid getting dirty. Now we take the knife in our hands. Remember to be careful - the blades of large office knives are very sharp. We begin to cut through our drawing. And here the most important thing is not to make a mistake. We cut out everything that will later be painted over, remember this and try to avoid unnecessary lines.
Our graffiti stencil is almost ready, but what about the cardboard? You can leave it in this form, and then simply fold it. Someone puts a large layer of paint on top, which makes the material more durable. In principle, an alternative to cardboard can be thin plastic or linoleum, which lends itself well to cutting, and in the finished version is simply rolled up. You may want to try other options, but then immediately think about how you will use your template outdoors.
Talk about the strength and durability of your stencil. Plastic variations may break or crack when carried, and this will affect the quality of the design. Cardboard is quite light, but many call it short-lived and this is quite justified. The paint begins to get wet; there is a possibility that by the second or third use the template will lose its proper appearance. But linoleum, despite its relative weight, is the most durable material to use. There are other options, but we do not recommend resorting to them: too light, like polyethylene, no matter how dense and multi-layered it is, it will subsequently be very inconvenient to use outdoors.
And some final tips. If you were unable to make a graffiti stencil with your own hands the first time, be sure to redo it or throw it away; any blots will affect the quality of the drawing. But choose a color scheme for stencil based on contrasts. The best option would be to use black, but if you resort to equally bright colors, then your image will only benefit from this. It will look much more impressive, and believe me, your drawing will certainly not go unnoticed.
Stencil graffiti. In general, stencil drawings can now very often be found on the walls of houses, on fences, on supports of bridges and overpasses and many other places in the city. The so-called stencils or stencil graffiti stand apart in street art. After all, as we have already noticed, drawings through a stencil can be of a different nature. But most often it is politically and socially agitational.
The first political propaganda stencils appeared in Paris during the revolution. And from then on it went. After all, this is the most inexpensive and one of the most effective methods of political propaganda. Italian fascists who painted Mussolini, Latin America, Europe in the 60s... But gradually stencil graffiti from the category of hooliganism turned into a separate genre of street fine art.
Stencils are most often one-color, because the street artist, inspired by the imminent appearance of the kids from the teaching staff, simply does not have time to change cans of paint. A separate stencil is made for each color. You can make stencils from anything.
I printed it out from several sheets, glued it together, then sealed it with several layers of tape for density and cut it out. That's it, the stencil is ready. If you don’t have a computer but you’re good at drawing, you can simply draw on paper and then transfer the outline onto linoleum or thick cardboard using carbon paper (believe me), but cardboard is less durable and not transportable.
Well, it's time to bring art to the masses. It is best to do this at night. About three or half past three in the morning. Because just at this time, gentlemen gopniks and cops (I don’t even know who is more useful) are sleeping. Yes, and grandmothers near the entrances also do not help convey to society what you wanted to convey. And their memory is also very good, especially for faces. Apply the paint carefully so that it does not flow. It is best to take gloves with you. Otherwise, you’ll be tired of washing your hands later. Moreover, the paint under your nails is further proof of your involvement in artistic hooliganism.
After you have completed your mission, you need to get rid of evidence of involvement in the mission as soon as possible. It is best to throw soiled clothes, cylinders, and gloves into trash cans in different areas of the city, having first erased your clear fingerprints from them. It is generally better to burn used stencils and rags.
But in any case, you need to look around. Run away. If caught, bathe on the spot. Otherwise you will pay an even larger fine later. Or you’ll even go to jail after all the apolitical slogans, a glass of weed and a couple of unsolved murders are hung on you.
But seriously, all your future missions to convey the truth to the masses of the people will be qualified by law as intentional damage to property (Article 167), hooliganism (Article 213), or vandalism (Article 214 of the Criminal Code of the Russian Federation). In general, depending on your luck. From a fine to a prison term. Some of them also sang and danced. And just as they sang in the temple, they ended up in prison. God bless the girls.
By the way, the stencils are already in the article. Print, laminate with tape, cut out and continue.
And thanks to hippy.ru for the help.


It is generally believed that graffiti stencils can significantly simplify the process of creating it. This is not entirely true. The simplest is wild style graffiti, which most often corresponds to bombing. In this case, it is better to call artists artists, but you can also call them graffiti bombers, and their main task is to make recognizable inscriptions or graphic symbols, do them quickly and do them in the most unexpected but crowded places. In some cases, the scandal surrounding the artist’s name is created precisely by the fact that he is operating where he is not supposed to.
Sequence of work on the stencil
In any case, if an artist has a creative idea, it first appears on paper. The answer to the question of how to make a stencil for graffiti is quite simple - draw and cut. But only with experience comes the ability to combine a plan with the technique of its practical implementation.
1. First a sketch is created
This is a drawing that initially implies that those parts of it that will be completely painted over with some color are intended for cutting out. One of the main tasks that a sketch solves is to find a balance between expressiveness and simplicity. Beginning artists are recommended to work with one, or maximum two, colors. Therefore, when developing a sketch, you need to look for a simple form that will express complex emotions.
2. The sketch is transferred to paper, film or cardboard
Everyone can find some better way. You can use carbon paper, first transfer the image onto film or transparent paper. When choosing cardboard, you should look for thin and dense options that can withstand any moisture and paint well. Thick and dense coated paper, as well as thick film, may be suitable.


When transferring, only thin lines of the main contour should be formed. Then the process of refining the image and creating bridges begins. These are the areas that will connect the space to be cut out with everything else. For example, without bridges it is impossible to make a stencil of the letter o. The result will be an oval, not a letter. If you cut out the space of the letter's outline, but leave the bridge, then the middle part will have something to hold on to.
3. Cutting
The larger the area from the outermost detail of the design to the edge of the sheet, the easier it will be to work with the stencil. Cutting is best done using a wood cutter, extremely sharp and sharpened at an angle.


4. Transferring the stencil to the wall


Multicolor image
When creating images in several colors with your own hands, you will have to make a color layout similar to that used in printing. You should get a stencil for each color. In this case, two options are possible.
Each color is cut out separately strictly along the contour as it is in the overall picture. So, to depict a tree with green foliage against the sky, you need to make two stencils - one for the leaves and one for the trunk with branches, since they have different colors. However, the cut out areas may be adjacent to each other, or may cover areas of other colors. For example, first everything is painted blue, a background is given, then a green stencil is used. After completing work with it, the entire crown of the tree will already be in the picture, and then an image of the branches that fall on the green area is applied and superimposed on top of it.
The specific method depends on the artist’s intention, the characteristics of the composition and his experience. To begin with, you can use a ready-made template, but only in order to master the technique itself. A true master creates himself, or he is not an artist. The same can be said about the use of graphics processors. With their help, you can do creative work in the same way or find an easier way to turn a photo into an image. There is no need to try to automate the process of creating your works without special reasons. If this happens, automation will become part of the creative process. But this is only possible if it suits the individual style of the street artist.
Tutorial on creating a stencil sketch in Adobe Photoshop:
Causes of stencil graffiti
They began to use a stencil for graffiti because there was a great desire to depict something meaningful, beautiful, and original on the wall of a house or on a fence, but the conditions themselves did not allow this to be done. Anyone can conduct such an experiment. Draw a silhouette of a person or some fairy-tale character on a piece of paper. And then try to draw the same one on the wall. You can choose some abandoned house where no one will see you and drive you away, and subsequently they will not punish you. But the experiment will make it clear that the wall creates completely different conditions. Its distinctive feature is unpredictability.
The fact is that this is not a flat wall, which is evenly plastered or painted, but an area that can be discovered during active research of the urban environment. Of course, street art can be different, some are created slowly and under completely legitimate conditions, but we are talking about how this happens most often. Usually it is necessary not only to quickly create at least the basis of a future work, but also to do it despite what the material is, without paying attention to unevenness, cracks and its very nature - whether it is a brick wall or a metal sheet. Therefore, graffiti artists strive to master methods that will allow them to transfer not even a drawing, but the creative concept itself, onto the wall. For her sake, you can go to any tricks...
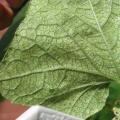 Who eats cucumber seedlings in a greenhouse and methods of pest control
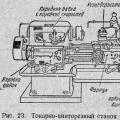 What are lathes?
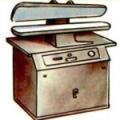 Wet-heat treatment of fabrics