Proper electrics in a new apartment. How to lay electrical wiring in the apartment with your own hands. Wiring tools
In old buildings, electrical wiring has been installed to provide electricity in the amount necessary to power appliances with a total power of 1-2 kW per apartment. Such power does not meet the needs of a modern person, and the wiring had to be replaced with a new one. In new buildings, the level of electricity consumption is taken into account, taking into account the use of air conditioners, computers, washing machines and other equipment. More reliable machines, modern RCDs, copper wires are used. How are electrical wiring installed in modern buildings?
Delivery status
Wiring in any new building already at the design stage is calculated in order to ensure an uninterrupted, safe supply of housing. At the same time, the power supply project takes into account the arrangement of all wiring in the building, including telephone lines, radio broadcasting networks, and fire alarm networks. This option is used when apartments in new buildings are rented on a turnkey basis.
The second option, according to which electrical wiring is carried out in a new building, provides for the introduction of only a supply cable into each apartment, designed to supply consumers with the required power. Further, the installation of meters, electrical installation products (sockets, switches) is carried out by the owner of the dwelling independently. In this case, either specialists are involved, or the work is carried out on their own with the necessary knowledge and skills. This option is appropriate if the premises are transferred to the owner without finishing, which is very often practiced in the modern housing construction market.
Regulations
The creation of a project and the installation of electrical wiring in a new building is carried out in strict accordance with the requirements of the standards noted in the documentation. The main documents are:

The latest editions of the PUE require that wiring carried out in a hidden way in buildings under construction must be replaceable, therefore, its laying is carried out in special electrical pipes made of polyvinyl chloride (PVC), which are embedded in building structures.
In new buildings, these works are carried out immediately after the construction of the building structure and the closing of the openings. Very often they take place in parallel with the work on the heating device.
Wiring device technology
To start work, you will need a wiring diagram, which will show the attachment points for sockets, switches, junction boxes, lines along which wires will be laid. The parameters and characteristics of the wiring are also indicated. The scheme is developed taking into account the requirements for future decoration of the premises, since some decisions in the design of wiring will depend on the material of the structures and finishing materials.
Convenient location
The location of electrical installation devices should meet the needs of future owners of the new building, the requirements of ergonomics. In this case, the scheme should take into account the minimum distances of the remoteness of the wiring elements from plumbing fixtures, gas pipelines. In agreement with the services of Energonadzor, it is possible to install utility panels with electricity meters inside the apartments of a new building. Their location should also be reflected in the diagram.

In accordance with the scheme, in the apartments of the new building they mark out the location of the future electrical wiring, and install cases of sockets, switches, junction boxes, switchboards. Nests and niches for them can be made in the walls. In this case, the enclosures of switchboards must be made of metal and embedded in structures using mortar grade M150.
Wiring
Further, all sockets, switches and lighting fixtures are connected with PVC pipes in accordance with the connection diagram. These tubes are buried in the wall structure. At the same time, chasing is not allowed in load-bearing walls made of reinforced concrete panels. Tubes are mounted under a layer of plaster. On ceilings, wiring is carried out in pipes embedded in reinforced concrete floors, or carried out in the voids of floor slabs. If the pipes were not embedded in the ceilings at the stage of building the building box, then they are also hidden by a layer of plaster or behind the structures of future suspended or stretch ceilings in a new building. On each section of the tube must be intact, without joints.
Connection and protection connection
At the next stage of work, all future junction boxes, sockets and switches are connected to each other and to the installation sites of lighting fixtures with cables of the type and section indicated in the diagram, pulled in tubes using special broaches. Cable ends are marked to avoid confusion when connecting.
 Next, the wires are connected in junction boxes. It is not allowed to make connections outside junction boxes, as well as in installation boxes and housings of sockets and switches.
Switchboards are equipped with circuit breakers to protect each individual circuit. For circuits in wet rooms, residual current devices (RCDs) or differential circuit breakers are installed.
In the communal shield, along with the meter, an introductory machine must be installed, which, like the meter, is subsequently sealed.
executive documentation
After wiring in a new building, it is imperative to draw up executive documentation reflecting the location of the electrical wiring in the apartment. When the owner of the apartment will install furniture, interior items, conduct additional communications, make holes in the walls, he must know the location of the wires. Otherwise, they can be damaged, and repairs will require a significant investment of time and money.
Such documentation is carried out in the form of acts for the production of hidden works, drawing up diagrams, using photographs depicting electrical wiring elements before plastering.
 In addition to this, all automatic machines and RCDs are marked and signed in the switchboard for the purpose of the circuits protected by them.
The information that is indicated in the executive documentation will subsequently be used when issuing a technical passport for a residential building (apartment).
But not always an existing project satisfies the owner of an apartment in a new building. The owner may be dissatisfied with the quality of work, the reliability of the gasket, the location of the meter or switchboard. In this case, it becomes necessary to change the wiring.
You can change sockets, switches, make convenient wiring inside a new building apartment without permission. But it’s not worth interfering with changes in the wiring diagram outside the apartment just like that.
Changes in the project
If the wiring in the building was carried out during the construction process, there is always the possibility that the owner of the housing in the new building will want to change it, focusing on their own considerations of functionality and convenience.
Any changes in the wiring diagram regarding its characteristics are considered to be a reorganization of the premises, and must be made in agreement with local governments based on their decision. This can be a change in the cross-section of wires, replacement of machines, a switchboard, a cable, an additional power line, and the like.
To do this, the owner submits:
- reorganization statement;
- contract of sale, gift or other documents confirming the right to use the apartment;
- refurbishment project;
- technical certificate;
- consent of all family members of the employer;
The conclusion of the body for the protection of monuments in the case of a new building is unlikely to be needed.
The decision will have to wait longer than a month - 45 days. Moreover, both permission and refusal can come. The countdown starts from the day the owner submits all the necessary documents. The body authorized to carry out approval, after making a decision, issues or sends a supporting document within 3 working days.
The document received by the owner will subsequently be the basis giving the right to reorganize the premises.
From this day on, it is allowed to carry out work on changing the wiring. At the same time, it must be remembered that new lines and laying parameters will be noted in the technical passport for the apartment.
But the problem is that the cost of such work as laying wiring is incredibly high. Of course, you can justify the price by the fact that everything will be done reliably, because. professional electricians know their stuff. Perhaps so, but where is the guarantee that the wiring in the new building will be carried out by a professional in their field? But the life and health of all who will live in this apartment depends on it.
That is why now it makes sense to figure out how difficult apartment wiring is to do it yourself, what knowledge and skills will be useful for this, and in general, whether it is possible to produce wiring without special education and how to do it right.
It is not necessary now to list all the necessary tools that will be needed when performing such work. It’s better to step by step analyze the main actions that need to be done when installing electrical wiring with your own hands, as well as remember the installation rules.
Step 1: Schematic
Performing such a complex task as do-it-yourself wiring in an apartment should begin with basic tasks.
The first and main thing that needs to be done before wiring in a new building is to draw up a diagram according to which it will be possible to draw lines correctly, to perform such a task as laying wires. This should be a kind of future wiring project, taking into account the location and power of all consumers that will be installed on the premises.
This does not require the knowledge of a designer or engineer, because. this scheme is compiled only for private use, namely as an aid in the question of how to lay wires around the apartment. Also on it in the future it will be easy to remember how the track is laid. It is necessary to apply all future sockets, switches and junction boxes to it, indicate the location of the lighting devices, so that everything can be done correctly in the future.
When drawing up an apartment wiring diagram, it is also necessary to take into account how the furniture will be located so as not to install sockets and switches, which will then be blocked by bulky cabinets, a headset, etc.
It is also necessary to take into account the length of the wires that will be laid.

Power calculations
Having drawn a diagram, it is necessary to understand what will be the power load on the cables being laid. This is required to select the desired wire section. The fact is that if the power consumption of household electrical appliances is too high, small wires may not withstand the load. This must be taken into account and this must be done before the installation of electrical wiring in the apartment begins.
All sockets and lighting devices must be divided into groups. Usually, according to lighting, the apartment is divided into 2 rooms per group. As for the lines of force, i.e. sockets, then the laying rules say that a separate one is needed for each room. Also, the laying of wires in the apartment provides for the fact that for electrical equipment with a power of more than 2 kW, it is necessary to allocate separate groups (dishwasher, electric boiler, electric stove, etc.).
The total power consumption of household appliances of the group is entered into the circuit, after which, according to the table or formula, the required wire cross-section is calculated.
The rated power of electrical appliances can be found in their technical documentation or information on the case. If a value range is set, the upper limit must be taken into account.
Step 2: Material Acquisition

The choice of cables for installation and electrical appliances (sockets, junction boxes, switches, lamps, etc.) must be approached very responsibly. Do not chase cheap products, as a result, you can overpay at times for a permanent replacement. But too expensive equipment for installing electrical wiring in an apartment with your own hands is unlikely to justify itself, and therefore the average price is more acceptable.
Regarding the metal of the cables with which it was decided to conduct electrical wiring in the apartment, of course, it is up to everyone to decide on their own, but although the price of copper is higher, such cables are still more preferable due to the increased service life. In addition, the required cross-section of copper cables is smaller for the same possible load, as a result of which the complexity of electrical installation is reduced. Copper cables also have one more plus - in their line there are flexible cables, the so-called KG. Therefore, experienced craftsmen say that it is better to conduct wiring in an apartment with copper.
It is better to postpone the purchase of an electric introductory power cabinet, as well as automation and electricity meters for it, until a later time. Indeed, before making the connection in the shield, it is necessary to carry out a complete installation in the apartment.
Dimmer or switch
Recently, instead of conventional switches, dimmers have often been installed - devices that allow you to smoothly turn on or off the lighting in the room. When purchasing such devices, you should be aware that if LED lighting is installed, then dimmer-compatible lamps are slightly more expensive than conventional ones that cannot work with such devices.
In addition, if lighting is planned based on fluorescent lamps or CFLs, then such soft starters are unlikely to be installed.
In any case, before purchasing such equipment, it is worth consulting with the seller, who will help in this or that matter.
Step 3: installation work

When the necessary materials have already been purchased, before laying the wiring, you need to mark the routes for future cable laying. To do this, having marked the places for sockets, switches and junction boxes, recesses are made using a special crown and a perforator. It is important that there is a junction box above each outlet and switch, with the exception of outlets that will be powered from the same group. They are combined with each other.
Between the recesses, according to the drawn wiring diagram of the apartment, lines are drawn along which a groove is made for the wire, the so-called shtraba - the wire will be laid along it.
Wiring must be parallel or perpendicular to the floor. Although, according to the old norms, it was allowed to lay by cutting corners with hidden wiring, this is not practiced today. And besides, in the production of subsequent repairs and drilling of the wall, it is necessary to understand where the cable is hidden, otherwise there is a risk of its breakdown. Therefore, laying electricians according to the new rules is more convenient. For the same reason, the cable laying scheme is preserved.
The wiring in the wall bars must be laid in segments, with the expectation of a slightly longer length, so that they protrude from junction boxes, sockets and switches by about 8–10 cm. This is done for ease of subsequent installation.
Also, socket boxes and junction boxes are installed in their places.
Wiring

Of course, after laying the wiring, the correct switching of wires in the apartment is required. Surely everyone saw that the insulation of cable cores has different colors, but some do not know what it is for. Such color coding has a specific goal - to facilitate installation and protect the electrician.
The fact is that, according to generally accepted standards, grounding always passes through the yellow-green, yellow or green wire. For blue or light blue - zero, but all other colors fall on the phase wire. If you make the wiring without looking at the color coding, errors are possible and, as a result, a short circuit or RCD operation for no reason. This must be remembered and taken into account when wiring wiring in junction boxes. When spreading the wires to the switch, you should know that it is the “phase” that should be interrupted, while the neutral wire goes directly to the lighting fixtures. Well, of course, both phase and zero come to the sockets. If the apartment wiring provides for grounding, a yellow-green wire is also suitable for sockets.
Connections in junction boxes must be tight. When using the twisting method, it is desirable to solder them. Of course, this is a very long and laborious process, and therefore it would be more acceptable to use special Wago-type terminal blocks, which allow you to make a connection very quickly, and most importantly, with high quality.
It must be understood that a weak, poorly twisted connection can cause overheating or even a fire in the wire - such a test is unlikely to withstand the wiring diagram. And it’s good if everything ends with a simple wiring replacement. There is also the possibility of a fire, and therefore it is worth paying special attention to this.
Examination
But laying the wiring is not the end of the work. After all, before you make a connection and inform the service organization about the need for verification, you need to test it. When checking, you should, for starters, use the dial of the multimeter. By connecting the wires one by one and checking for correct connections in the junction boxes, you can generally understand whether the circuit is wired correctly.

To fully check the wiring in the house, a conventional circuit breaker will be needed. The smaller its face value, the better, because. there should be no load on it. The algorithm of actions will be as follows.
First you need to check if the bare ends of the wires are touching anywhere. After that, each group is checked separately. To do this, you need to connect a plug to the end of the line, with the phase wire passing through the machine. By applying power to the group, you can determine if there is a short circuit in it. If it is present, the automation will turn off the voltage.
If everything is in order, the consumer connection points are checked with a multimeter.
When performing these actions, you must be especially careful to prevent electric shock, because. this procedure is not safe.
Mount or not
Wiring in a new building is, of course, a very complex and responsible matter. It requires precision and extreme composure. But still, observing certain rules for installing electrical wiring and electrical safety, this work is quite within the power of a home master. For this, the above information is provided, namely, step-by-step instructions on how to do electrical wiring in an apartment with your own hands. After all, this can save a decent amount on the work of a professional electrician.
But if, nevertheless, there are doubts that it is possible to do it with your own hands (wiring in an apartment is a responsible matter), of course, you should contact the specialists even before starting work. After all, if half of the work is done, a professional who rarely respects his work will undertake to finish it, because it is easier to start all over again. And therefore - the choice is up to the home master, and there can be no advice here.
And yet it is better to trust such a responsibility to yourself and make an electrician personally than to “hand over your life and health” to someone unfamiliar.
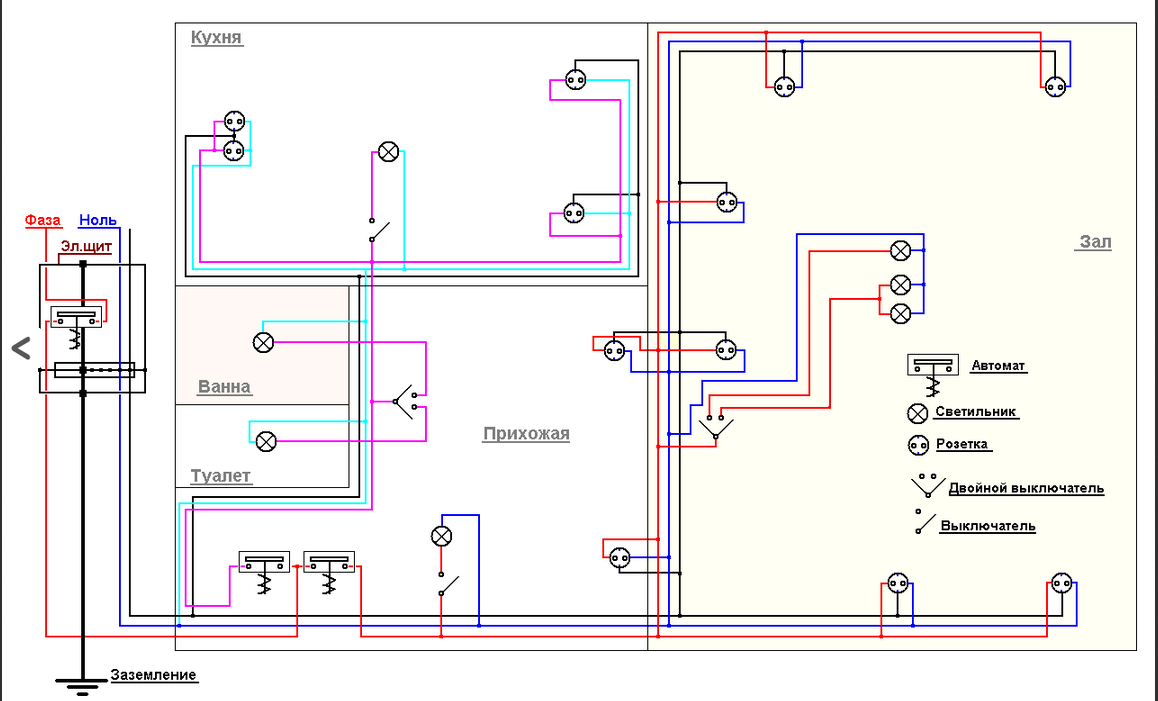
When planning to replace the wiring with your own hands in a one-room apartment, or with the help of a professional electrician, you need to draw up a connection diagram for all wiring lines, sockets, switches, junction boxes, various permanently installed electrical appliances (fan, air conditioner, electric stove), circuit breakers and residual current devices ( RCD).
In terms of wiring, in addition to bringing electrical connections, it is also desirable to indicate the exact location of the connection point for each electrical receiver in the apartment.
 Example room wiring diagram plan
 With regard to one-room apartments, due to the seeming simplicity of cabling, many novice craftsmen ignore the wiring layout, immediately starting work, vaguely imagining the circuit and the end result.
As a result, with this approach, you may encounter unforeseen difficulties and problems. In addition, incorrectly laid electrical wiring with your own hands, without knowledge of the rules and requirements, can cause an accident.
 accident, burnt socket and electrical wiring
 Step-by-step formation of a general wiring diagram
When drawing up a cabling plan, it is necessary to divide the wiring diagram drawing into four stages, one for each room of a typical one-room apartment (living room, hallway, kitchen, bathroom).
 An example of a wiring diagram in a one-room apartment
 Regardless of the layout of the dwelling, it is necessary to think over the electrical wiring for each room separately, based on the specific purpose of each room.
Specifics should be understood as the use of electrical appliances and equipment, as well as the location of sockets, switches, and controls. It is necessary to familiarize yourself (information is available on this resource) with the specifics of the electrical wiring device in each room of the apartment, drawing up a general scheme with your own hands.
Calculation of cables based on the load
When drawing up a wiring diagram for each room, it is necessary to adhere to the fundamental sequence of actions that come from a logical chain of concepts, the explanation of which is beyond the scope of this article:

Therefore, it is necessary to correctly calculate the cross section of the wires intended for installation, and indicate them on the plan diagram. The methodology for self-calculation of cross sections for current or power consumption can be found on this resource, or taken from other trustworthy sources.
 An example of a diagram of switching devices divided into groups and cable sections for a one-room apartment
 There you can also find a description of the types of electrical wiring, how they are laid and the types of cables used.
Separation of electrical wiring into separate lines
Another principle that should be followed, regardless of the purpose of the premises of a one-room apartment, drawing up its wiring diagram with your own hands, is the division of consumers into groups.
 An example of a wiring diagram in an apartment
 The minimum option is a group of sockets and lighting. This means that separate cables protected by automatic machines for sockets and electric lighting devices should go from the apartment shield.

In addition to electrical safety, this approach compares favorably in terms of the convenience of replacing a switch or socket with your own hands - it will be possible to use electric lighting fixtures without turning off the electricity in the entire apartment.
 Bathroom scheme
 For powerful consumers of electricity, such as a boiler, electric stove, air conditioner, refrigerator, it is necessary to lay a separate line.
 Wiring diagram in the kitchen
 This requirement is justified by the fact that the cross section of the wires that provide power to these electrical appliances must be larger than for cables that power less powerful equipment.
Accordingly, a circuit breaker designed for this section may not work if an overcurrent appears in a cable connected in series with thinner cores, leading to overheating, melting and ignition of the insulation.
Protection from defeat
All groups of outlets must be equipped with RCDs that respond to current leakage through the human body or insulation. In this way, protection against damage is realized when a dangerous voltage appears on the body of electrical appliances, and fire safety is ensured. In relation to the bathroom, the presence of an RCD is a prerequisite for installing sockets.

It is advisable to install an RCD on the lighting line too, especially for the bathroom. For example, metal parts of wall lights can become live and cause injury if touched.
In addition, there may be water in the junction box, switch or terminal block of the chandelier due to the fault of the neighbors from above. Water on conductive surfaces will not cause a short circuit and cause the machine to operate, but may cause leakage, leading to damage to insulation and lighting equipment.
RCDs must be connected in series with the circuit breaker, and the rated current of the RCD must be one value higher.
 RCD connection
 The RCD + automatic circuit can be replaced by a difavtomat, combining both of these devices, which are installed in the apartment switchboard.
 The shield itself should be in an accessible place at a height inaccessible to small children.
 Installation height of the switchboard in the corridor
 The need to comply with rules and regulations
When drawing up a wiring diagram, in order not to accidentally damage other communications when installing wires, it is necessary to have at hand a plan for their wiring in the apartment.
After checking the location of pipelines and various cable lines, it is necessary to conduct electrical wiring, if possible avoiding its intersection with these communications, adhering to the rules for laying electrical wiring, which are described in detail on this resource.
 an example of the location of the wiring in the room
 For convenience, this article contains quotes from the rules for the installation of electrical installations (PUE) and building codes and regulations (SNiP).

These regulations also include the location of electrical wiring, sockets and switches relative to doors, walls, floors and ceilings. Determine the exact location of the wiring and electrical points in the apartment, indicating the distance in meters or millimeters on the plan.

Since access must be provided to junction boxes, their number can be reduced - when planning the wiring for sockets and switches, it is worth planning in such a way as to make the necessary connections in the sockets of switches and sockets.
Symbols on the plan
If you need a professional drawing of the wiring diagram for the documentation for the apartment, then it is better to contact the relevant organizations that have qualified specialists, and having the right to draw up such documents.
But when compiling a wiring diagram for the master, or planning to do all the electrical work with your own hands, you need to learn the minimum set of symbols for various electrical outlets and power receivers that are often found in an apartment.
 symbol of switches and sockets on the diagram
On the wiring plan, all three wires required to connect the sockets (phase, zero, ground) can be marked with one line to make it easier to read the diagram, and the wiring lines for individual consumer groups should be indicated in different colors.
 hand drawing of apartment
 The drawing can be drawn by hand, the main thing is to be careful and accurate in the notation.

There are many residential wiring diagrams on the Internet, they can be used as a template, adding and changing as needed.
The wiring diagram in a one-room apartment in old houses in most cases does not meet modern requirements at all. Therefore, when repairing an apartment, you should worry about its mandatory replacement.
This will not only save you from a lot of problems in the future, but also protect your home from possible fires. Indeed, according to statistics, it is the short circuit of the old wiring that is the main cause of fires in our country.
Choosing the main parameters of the electrical network of your apartment
So:
- The choice of section and material from which the wiring will be made in a one-room apartment, and the layout of its placement largely depend on the type of gasket and the total power of all connected devices.
Therefore, first of all, we should draw up a plan for the location of sockets and a lighting network. In this case, one should be guided by the norms of the "Electrical Installation Rules" (PUE) and elementary concepts of convenience.- Installation of switches in the bathroom is prohibited
- In the bathroom, it is prohibited to install sockets without RCDs.
- The switches in the rooms should be located at the door on the side of the door handle.
- Outlets in residential premises can be located based on the convenience of their use. In this case, the recommended values \u200b\u200bare a height of 0.3 to 1.8 meters.
- Switches are usually located at a height of 0.6 - 0.8 m.
- The next important step is choosing a wiring diagram. The method of open wiring in ducts or hidden wiring in walls can be used. Each of these methods has its own advantages and disadvantages. So the advantages of open wiring include:
- Possibility of installation without making repairs in the room. You simply mount an additional box under the ceiling, into which the wiring is subsequently laid.
- Significantly reduces installation time. So with the right approach, in a one-room apartment, all wiring can be replaced in just one day.
- Ease of repair work and subsequent installation of additional electrical receivers.
- But the advantages of hidden wiring are somewhat greater:
- According to the PUE, much lower requirements are imposed on hidden wiring. As a result, it is far from always necessary to use additional protection against mechanical and thermal damage. And there is no need to buy additional boxes for it. Due to this, the price of the issue is much lower.
- Flush wiring with the same wire cross section has slightly higher tolerances for nominally permissible currents and overload currents. This is achieved due to higher quality indicators of heat transfer.
- Hidden wiring does not spoil the appearance of your apartment at all and does not take away the small space of the apartment.
- Based on all this, we can conclude that open wiring is chosen only in exceptional cases. For example, when the repair has already been completed, but the wiring was forgotten to be replaced.
Or when wall chasing is highly undesirable due to the dilapidation of the building. In other cases, the best option is, although more time-consuming, but the option of hidden wiring.
Calculation of the electrical network of a one-room apartment
So:
- First of all, we need to calculate the rated load of all your electrical receivers. To do this, we use a simplified formula; where P is the rated power of electrical appliances, U is the rated voltage of the mains (for a single-phase network it is 220V), and I is the rated current of our mains.

- Based on this formula, an electrical appliance with a power of 1 kW consumes a current of 4.55 A. To simplify the calculation and create a certain margin, we take it equal to 5A.
- When calculating your electrical network, consider only realistic situations of its use with maximum load. You should not rely on the fact that you will connect four 2kW heaters at once in one room.
After all, the probability of this is quite low. And the wiring diagram in a one-room apartment from such a calculation will become much more complicated and increase in price. - Now we proceed to the selection of the wire we need. This should be done in accordance with clause 1.3 of the EMP.
But given that our loads are not large and we do not need an ultra-precise calculation, we make an approximate calculation. To do this, we assume that a cross section of 1 mm 2 of copper wire has a throughput of 10A, and aluminum - of 5A.
When repairing or buying an open-plan apartment in a rough finish, the question of electrical wiring will definitely arise. The choice of the connection scheme, as well as the choice of materials used, will depend on where the partitions, household and lighting devices will stand, what the purpose of the premises is. It is necessary to take into account the material of the walls, floors, where the electrical wiring will pass. The main thing is to correctly determine what, ultimately, you want to get. Only having found out this, you can begin to develop a wiring diagram. Essentially, this is a wiring diagram, so you need to consider the installation requirements.
Main Rules
Electrical wiring should be designed in compliance with building codes and regulations, and installation should be carried out in accordance with the rules for electrical installations. The requirements of these documents must be observed, as they are written and take into account all accidents in everyday life and at work.
Below are the basic rules by which wiring is done in a house or apartment. According to them, they make schemes.
There should be easy access to the switchboard, meter, junction boxes, sockets and wiring switches.
Sockets must be installed at a height of 30 - 80 cm from the floor and no closer than 50 cm to gas, electric stoves, radiators and pipes. The cable to the sockets must be laid from below. The number of sockets to be installed in a room is determined at the rate of 1 socket per 6 square meters. The kitchen is equipped with as many outlets as required for appliances. The outlet in the bathroom should be connected through a low-power transformer located outside its walls.
 Switches in the apartment are installed at a height of 60 - 150 cm from the floor in easily accessible places. The wire to the switches is laid from above.
Cables must be laid in a straight horizontal or vertical line. Crossing of cables, as well as laying diagonally or in a curve, is not allowed. When laying electrical wiring horizontally, the distance between the wires and floor beams must be at least 10 cm; ceiling and wire 10 - 15 cm, and from the floor to be laid at a height of 15-20 cm. In the case of a vertical laying, the wires must be at least 10 cm from the edge of the door or window opening; from gas pipes - more than 40 cm.
Cables for any type of electrical wiring (external or hidden) should not come into contact with fittings, mortgages and other metal parts of building structures.
If you are laying a cable under a heating pipe, you need to remember that the distance between them must be at least 3 cm. When laying in parallel, you must provide a gap between the wires of more than 3 mm or run them separately in a cable duct, corrugated pipe. Wiring must only be done inside junction boxes.
The connection of cables from different metals is carried out through a special block. The ground and neutral wires are attached to the devices only with a bolted connection.
Wiring methods
There are three ways to wire wiring in an apartment:
- star;
- plume;
- combined.
The first wiring diagram of the "star" type. With this wiring, each device has its own overload protection circuit breaker and a cable from the switchboard to the device. This wiring option is good because it is possible to control any device and in case of repair it is not necessary to turn off other devices. Used in the Smart Home system. It is useful when raising children, you can set the connection time for a particular device, turn off the light at a certain time; to scare away thieves by programming the switching on and off of lighting devices in the absence of the owners according to a certain algorithm. It has one drawback - the most expensive.
The next circuit is called a "loop". This type of wiring is similar to the previous version, only several devices are located on one cable. Much cheaper than Zvezda.
The most common version of the wiring diagram - with junction boxes, combines the qualities of the first two types. From the electrical panel, several cables go to junction boxes, and from them to a group or individual devices in the apartment.
It is impossible to get hung up on any one type of wiring. For example, if you need to connect a powerful consumer of electricity, then the "star" type is used, if a group of low-power ones, then a loop.
 Before you need to study where other engineering systems lie, the material of the walls, floors and ceiling; is it possible to do without chasing the walls; find out the power, number, location of devices. For example, if the ceilings are made of hollow core slabs, then they can be used as cable channels.
Thus, it depends on financial capabilities, the number and type of electrical installations, their location. Only after receiving this information, you can understand what wiring diagram in the apartment is required, and proceed with the design.
Sequencing
First you need to take a drawing of the apartment or make it yourself on a scale with the location of windows and doors. Then place on the plan all energy consumers by rooms, indicate their power, based on this,. It can be:
- lighting;
- socket;
- a group of rooms and a corridor;
- bathroom group;
- if the apartment has an electric stove, then a separate group for it.
Depending on the number of rooms and loads, the number of groups will be determined. So kitchen and corridor sockets can be divorced into two different groups. This is necessary in order to minimize the cost of wires and facilitate further maintenance of the electrical network and repairs.

Each group must be connected through a residual current device RCD (usually called an automatic device). For the lighting group, a 16 A automatic machine is provided, for a socket outlet for 25-32 A, and for an electric stove - 40-63 A.
After the position of all electrical wiring devices has been determined according to the diagram, the number of wires and their cross section are calculated.
The wiring diagram in the apartment must be drawn up in several copies, since in the process of work unforeseen moments appear that will need to be noted on the diagram. In addition to the circuit diagram, you need a wiring diagram for direct performers. Electricians work on it and make changes.
The wiring diagram with all the changes after the completion of the work becomes the executive. This is the scheme that you need to request from the previous owner of the apartment.
What does it indicate
The diagram should indicate all the dimensions of the premises of the apartment, the distances between various electrical devices. This will allow you to accurately calculate the amount of required materials and reduce installation time. It is better to draw different groups in different colors, the diagram becomes more readable. In addition, it is necessary to show where which sockets (single, double), switches (one, two, three-gang) will be placed. The diagram will look something like this.

In addition, a list of materials and devices that need to be mounted is attached to the diagram. Additionally, you need to take into account the consumables used during the installation process, such as plastic clamps, pads, dowels, electrical tape, alabaster for mounting socket boxes in the wall. To determine the exact amount of cable required, you will have to measure with a tape measure, take into account the height of the ceilings.
 When choosing a cable, it is better to stop at a copper type VVG, compared to aluminum, it has a higher conductivity and excellent flexibility, installation is facilitated. In apartments, two, three-wire cables with a cross section of 2.5 mm2 are usually laid for sockets, and lighting is connected with a 1.5 mm2 cable. From the floor electrical panel to the apartment panel, wiring is carried out with a 3-5-core cable with a cross section of 6 mm2, for powerful appliances such as an electric stove, a boiler, a cable with a cross section of 4 mm2 is used so that it does not heat up.
Floor and ceiling lining
 If there is an intention to make a concrete floor screed, you need to use this, conduct electrical wiring along the floor in the corrugation, then only pour it with concrete. It will save materials and reduce the amount of work. With a stretch or false ceiling, the consumption of materials can also be reduced, the scheme and work can be simplified.
The cable is simply attached to the ceiling from the outside. If you allow outdoor installation, you can significantly reduce the time of work through the use of cable channels. At the same time, the most dusty work - gating - disappears. Accordingly, all this should be reflected in the scheme and materials.
Usually single-phase electrical wiring in the apartment is used. If the apartment is large, with high electricity consumption, then a three-phase power supply may be required. The difference is small. There will be a three-phase meter in the floor shield.
Three phases will go to the apartment switchboard, and then everything is the same as in the single-phase version. When installing in junction boxes, the main thing is to do everything right, not to mix up the phases so that the device does not receive 380 V instead of 220 V. If there is no experience in such work or electrical education, it would be right to invite a specialist.
 Arch calculation online calculator
 Start of possible movements
 Determination of the reaction of the steel beam supports Plotting the torques